Saturday, November 20, 2010

Bookend Cozy Instructions- Scrapbooking in Melbourne, Florida


Welcome back, y'all!  If you didn't get a chance yesterday, please scroll down to my last post and leave a comment for a chance to win a Grand Calibur and other wonderful prizes!

Yesterday I promised that I would post instructions for the Bookend Cozy that I created for the Spellbinders' Holiday Hoppin' Blog Hop.  Well, here they are!

I decided that since my sweet mom gave me her old bookends to use, I would cover one for her sewing room.   I will probably go back and 'tweak' it a little....it should have buttons and seam binding on it, right?  ha.  But I wanted to get this finished in time to post for you.

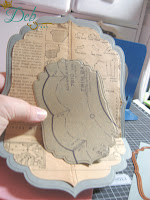
First I cut out all of the elements for my project.  I had purchased an old sewing pattern, so that seemed perfect to use as my background paper!  It was creased and brown, but I like it that way (vintage, right?  ha!).


Of course it needed stability, so I began with a piece of soft gray cardstock with the largest of the LF-190 Grand Labels Four die templates.  As you can see, I also cut a portion of the larger template with plain cream cardstock to use as the back of the cozy (sleeve). Use the next size (second to largest) die template


to cut the pattern instruction paper.  Then use the smallest die template to cut the actual pattern.  Now, the pattern paper is extremely thin, so I ran a piece of the grey cardstock through my Xyron 5" sticker maker and slapped the pattern onto it before I cut it.  See how nicely it cut?

I used another die template from S4-298 Antiquities - the crown! - and another piece of F-013 Premium Craft Foil -purple! - just for fun.  I may or may not leave it on the project once I fuss with some buttons.


Now begin your assembly.  Score your large template so that it will 'sit' on your bookend, yet still cover it.  I scored mine three inches from the bottom, but yours may vary depending upon your bookend.

Attach the top portion of your patterned paper piece with adhesive (I used a tape runner).  Now, apply adhesive to the bottom piece, but make sure it is standing at a 90 degree angle (straight up) before you smooth it down.  If you adhere it totally flat, it will wrinkle and buckle when you fold it.

Place this on top of your back cover piece and draw a line along the bottom.  Cut along the line; now your back cover piece will exactly fit onto the back of the front piece (clear as mud?  ha).

This part is crucial - put your adhesive ONLY AROUND THE EDGES - top and sides only - so that your cozy will slip over the top of the booked!  You can see in the photo how I have placed the tape just around the edges.  Now, I suggest that you use a strong red-line tape.

Decide where you want to place your smallest pattern piece and score it accordingly.  Adhere it like you did the paper (top first, fold, then adhere the bottom).

Embellish!  I added a pretty bow as well as the crown topped with a white pearl.  I may go back and remove the crown and add a few buttons.  We shall see!


Here's how the back looks after I've slipped the cozy over the bookend.

My original idea was to put a photo in the center - think of all of the possibilities!  Kitchen Bookend Cozies for Grandma with photos of her baking cookies with her grandbabies.  Who couldn't use bookends for their cookbooks?  'Nuff said.

I hope this was instructional for you.  Most of all, thank you so much for all of the sweet, precious comments on yesterday's post.  It's so rewarding to feel that you have inspired someone to create!   I hope you become a follower of my blog (see the column to the right) and let me share more ideas with you!

Now, send me photos of your cozies so I can share them!  Oh, I can't wait to see what you create!

Enjoy,

Friday, November 19, 2010

Spellbinders' Holiday Hoppin' Blog Hop!!!!


Welcome to the second day of the Spellbinders™ Paper Arts Holiday Hoppin’ Blog Hop! Spellbinders, along with cross promotional partners, are showcasing their newest products just in time for your Holiday crafting and gift giving. Lots of creative ideas are in store, as well as prizes galore!

Each participating company has generously donated towards the prize package listed on the Spellbinders Blog. A total of two identical prize packages, one for each day, November 18 and 19 will be given away!

To enter, just leave a comment on a participating blog! Comments in the first 48 hours of the post are eligible. One commenter each day will be randomly selected as the winner. Winners will be announced on November 22, on the Spellbinders Blog!

Be sure to see all of yesterday’s Holiday Hoppin’ blogs for inspiring projects and another chance to win!
Visit (and comment on) all of today’s Holiday Hoppin’ blogs:


Mona Pendleton

Gina Hanson

Deborah Young - you are here!

Becca Feeken

Julie Overby

Kimberly Crawford

AJ Otto

Margie Higuchi

Beth Pingry


Jennifer Holmes

Kerry Urbatch

Shona Erlenborn 

Tammy Inman


Jessica Turner

Brenda Hurd

Julie Koerber

Rae Barthel


Rachel O’Crowley

Kellie Fortin

Kristen Cohen

Joy Dickson


Candy Rosenberg

Laura Craigie

Stephanie Hester


Leesa Crutcher


Nina Brackett


Today I am using Spellbinders LF-190 Grand Labels Four die template set to create a couple of quick, easily-reproducible projects for you!  This set of six GRAND die templates ranges from 5-1/4" to 9-3/8" long!

I used the fifth die template (from the inside - second to largest) to make a card that fits exactly in an A2 envelope.  It's my new take on a gable card that has the opening down the center front of the card.  It was quick and easy to cut with my new Grand Calibur!  Since the plates are so large, you can easily cut all of your die templates at one time! Bundle up a set up these and you have a unique gift that will be appreciated.

The keyhole die template was cut from the new Spellbinders premium craft foil - this color is Gunmetal.  Since the Spellbinders' die templates have decorative openings, I stenciled the metal with black ink to highlight the intricacies of the beautiful Antiquities die template.  I threaded the ribbon through the holes on either side of the keyhole to tie the card shut.


Open it to see the full Grand Labels Four die template!  If your die template is 8" long, score your card 2" (one-fourth of the length) from each end and you instantly have your card base!

What do you buy that guy that has everything?  I kept the embellishments to a minimum on my next project so it can be used in the workplace or a men's office.  It's a bookend cozy!  That's right - I took an old metal bookend and made a little removable cover with my Grand Labels Four die templates!  This time I used the largest, second largest, plus the smallest die templates in the set, so you can see the size progression.  I love having the choice of six sizes - there's always a size to fit my project! At just around $8.00 per die template, you can't beat the value!

This closeup shows why I love Spellbinders over other die templates (besides the value, the great designs, the embossing....ha!).  See the vintage shadow that is inked just inside the embossed border?  Spellbinders' open-faced templates allow you to stencil the 'face' of your project with inks, chalks....your favorite medium.  I used another die template in the Antiquities set - the Fleur di Lis (yum!) cut from the Copper craft foil this time.

Here's a more feminine version of the Bookend Cozy.   It's so simple - come back tomorrow for complete instructions.

Supplies:

Blessings Card:
Spellbinders ProductsLF-190 Grand Labels Four; F-012 Premium Craft Foils (Gunmetal); S4-298 Antiquities; S4-290 Labels 14; Grand Calibur
Papers and Stamps: Donna Salazar's Grandma's Garden (D3-9585 English Roses) Designer Paper; Gina K (Lovely Labels) Stamps
Inks and Supplies: Versafine Vintage Sepia Ink, CTMH Black Ink and Adhesive Pearls, Creative Impressions Crepe Ribbon, White Lace, Scrapbook Adhesives by 3L Black 3D Foam Squares

Fleur-di-lis Bookend Cozy:
Spellbinders ProductsLF-190 Grand Labels Four; F-012 Premium Craft Foils (Bronze); S4-298 Antiquities; Grand Calibur
Papers: Graphic 45 Steampunk Debutante; WorldWin Cardstock (Malt, Black)
Inks and Supplies: CTMH Desert Sand Ink, Liquid Glass; Sheet Music; Adhesive

Ladies' Bookend Cozy:

Spellbinders Products LF-190 Grand Labels Four; F-012 Premium Craft Foils (Copper); S4-299 Fallen Angel; Grand Calibur
Papers: Graphic 45 Steampunk Debutante; WorldWin Cardstock (Maroon-back of cozy)
Inks and Supplies: CTMH Lagoon Ink, Liquid Glass; Adhesive

Now it's time for you to leave a comment on my blog to be eligible to win the Spellbinders Holiday Hoppin’ Prize Package! One winner will be chosen from all the comments on all the blogs participating today. Comments made in the first 48 hours of this post will be eligible to win. Winner’s names will be published on the Spellbinders Blog on November 22 (Monday), and they will have 48 hours to reply to Spellbinders to claim the prizes.

Thanks for hopping with us.  Good luck!

Wednesday, November 10, 2010

JustRite Challenge 043 - Scrapbooking in Melbourne, Florida


I was inspired by Pink Paislee's latest line by House of Three, "Parisian Anthology"......yummy blues, greys, whites....all those muted colors I just love!  
The current Just Rite 043 challenge is to create either a sympathy or friendship card.  I decided to use a sentiment from JustRite's "Seeds of Kindness" stamp set along with some of my favorite Nestabilities(R)

What, no bows or flowers?  ha!  I thought the ruffled  ribbon could stand on its own.  Isn't it lovely?  It's part of the Parisian Anthology collection.  And I sewed!!

Stamps:  Seeds of Kindness (JustRite)
Paper, Note, Ruffled Ribbon:  Parisian Anthology (Pink Paislee)
Dies: S4-114 Standard Circles LG, S4-249 Big Scalloped Circles LG, S4-293 Lacey Circles (Spellbinders)
Cardstock:  Silver Linen Core, White (WorldWin)
Other:  Lagoon Ink, Lagoon Ribbon, Pearls (CTMH)

Well, I've decided to try to recruit physicians from home.  Who knows if I'll be as successful as I was working at a "real" job, but I have to try!  Let me know if your company needs a new physician, or if you know of a physician who wants to relocate.  Now how's that for a start?  tee hee

I just received some stamps from a new (to me) company, "Layers of Colors".  They are compatibility with some of my favorite Nestabilities, so I'll try to get back to the studio this week and have something new for you!  I appreciate your sweet comments; they are precious to me!

Till then,

Monday, November 8, 2010

Round Friendship Card - Scrapbooking in Melbourne, Florida


Good morning, friends!  It has been chilly this week in Florida, and we are loving it!!! My two kitties fight for the 'best' spot by the open sliders - the one with sun streaming in at just the right angle with that burst of a cool breeze.  Spoiled rotten!

I'm determined to take more time to create in my studio.  I so love doing it!  This weekend I made a round card using the Play Date Cafe's Challenge #54 colors.  And it's round!  Which fits in with the Card of the Week Challenge!  woohoooo!  ha.

I used mostly Close To My Heart supplies for this one with a little Hero Arts crocheted lace thrown in.  I like how it turned out!

Do you cut your own round card bases?  This is the first I've used from my new CTMH cards - comes with matching square envelopes.  Gotta love that!

I'll be back in a couple of days with an altered item that I created for the Spellbinders(TM) gallery. 

Till then,

Wednesday, November 3, 2010

Mojo Monday 163 - Scrapbooking in Melbourne, Florida


Hello, friends!  Did you vote yesterday?  I trust that the answer is a resounding "YES"!


Believe it or not, I created a card today for the Mojo Monday 163 challenge! 

I realize I have been relatively absent lately.  Trying to find a job is not much of a mojo generator!  But I needed a card for a fellow blogger who lost her husband this weekend after a long illness.  So devastating and so very sad.  I know I cannot even imagine her sorrow.

I decided to use some elements with a vintage feel.  My mom gave me a lot of old sheet music.  I would use it in every project if I could!  It may get monotonous, but I just love it.  The lace is from Hero Arts and the Prima roses were a gift from my friend Mona (thanks dear!).  The sentiment is from Verve and the die templates are my beloved Spellbinders(TM)


Well, my son Alan is graduating (B.A.) from the University of Florida in December!  He had to pass a French college equivalency exam  or take French in the spring and graduate next spring.  So he has spent the past month re-teaching himself French, as he had not touched it since high school.  He took the exam yesterday and found out this morning that he passed!  Not unusual for him to pass an exam, but he was so worried about this one.  Now on to the Physics GRE so that he can start graduate school next year.  Better him than me, for sure!

I hope to be back soon with something else to share ;-)

Till then,


Monday, November 1, 2010

BOO! Spooky Halloween - Scrapbooking in Melbourne, Florida

Oh good grief!  How could I miss posting my Halloween card.  Ha! 

Well, I was busy finishing up my design team projects for October (yowza!), and it just slipped my mind.  Don't you love this stamp?  It was one of CTMH's stamps of the month this fall.  It's so insanely awesome that I'm hopeful it will come back as a regular.

The skull, the background stamping and the sentiment are all from the same stamp set.  The paper is from CTMH's "Hooligans" and the webbed ribbon is from Creative Imaginations.

Now, how about that spooky skull at the bottom?   Mwaaah ha ha!  It's just one of several Spellbinders(TM) die templates used on this card!  Oh, how I am loving my Spellbinders die templates!  The skull was cut and embossed on white cardstock, then stenciled with black ink.  Spellbinders' die templates have openings just 'dying' for your sponge.....just one of the many wonderful things about these die templates, and one that makes them unique! 

Still looking for work....

See you soon!